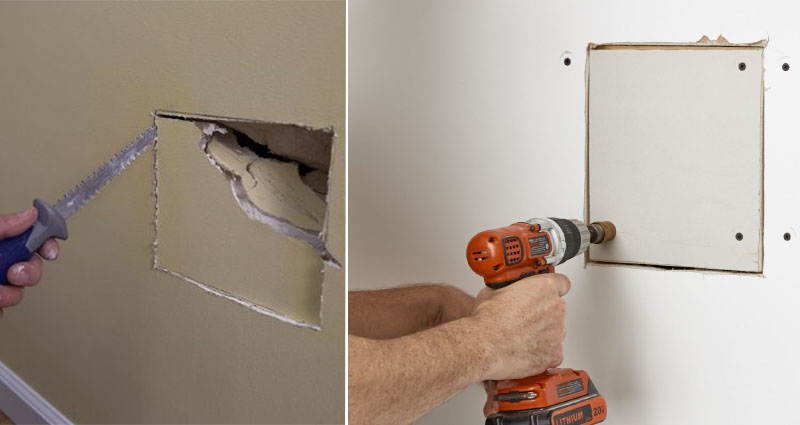
Make positive there is no wiring or plumbing behind the drywall surface before cutting by looking by way of the hole with a flashlight. Trim the edges of the hole to build straight sides and a square or rectangular general shape. Use a framing square and a pencil to mark cutting lines on the drywall.
Repair Cracked Plaster with Drywall or Washers
Also, for joint compound to seem flush with the wall close to the damage web page, “feather” the mud as you apply it. Hold the knife at a 70-degree angle, pressing tougher on the outer edges of the mud as you move away from the center. When you have done that, safe a section of drywall that fits inside your cutout, cover the seams with self-adhesive mesh and apply drywall joint compound. Then, sand down the join compound and repaint as necessary.
Tools
Repairing substantial holes in drywall—anything more than six inches—is distinctive fromfixing a little hole in drywall. Small holes can be patched over with drywall tape or a self-adhesive drywall patch, but huge holes will need a more rigid material to span over the bigger opening. Apply a second coat of joint compound employing a ten-inch taping knife. Once again applying a slightly wetted taping knife, apply a second coat of premixed joint compound that is 6 to 8 inches wide and covers the initially layer of compound.
Load the roller with compound and roll it onto a piece of cardboard to test its consistency. Add far more water if the it really is as well thick, or more compound if too thin. Stir a can of sealing primer with a paint stick.
If preferred, wet-sand with a wet-sanding sponge to hold down the amount of dust. Clean off all sanding dust with a dry rag. So, then you are left with small “nail pops” that are “oh so a great deal enjoyable” to try and repair since you have to patch and paint. Slip the 1×4 into the hole with the glued surface facing the back of the drywall.
Place it atop the joint and use your taping knife to smooth the new tape into the compound. Be sure there is no air trapped beneath the tape or wrinkles anyplace along its length. There aren’t any unique tools necessary for drywall repair. Reduce away the broken section of drywall tape working with a quite sharp knife or breakaway razor utility tool. Then very carefully pull off the damaged section of tape.
Nails That Go Pop: Step Two
Drywall tape is readily available in paper or mesh, select mesh if you have a selection. The tools in bold are necessary for every step, regardless of hole size. Apply joint tape (employing joint compound if it is not self-adhesive) around the edge of the patch.
You can get into corners much more effortlessly by utilizing a sanding sponge. Where many screws are placed in a row, spot-patch every single with compound and cover them with a strip of fiberglass tape as described in the measures above. This level of finish is not advisable where smooth painted surfaces or light to medium wall coverings are specified. The procedure that requires the most time is the drying and sanding which is impossible to speed up if you want the job done appropriately. If not mixed up thoroughly adequate you will have lumps in your mud, hence creating your taping job tougher. Dries incredibly hard compared to pre-mixed mud which adds to strength of repair. Sets fast to enable for a number of coats in a quick time periode.
