
Modern Bathroom Remodeling Trends for Master Suites: Elevate Your Oasis
When it comes to creating a luxurious retreat within your home, the master suite bathroom plays a pivotal role. From sleek finishes to innovative technology, modern bathroom remodeling trends are transforming master suites into sophisticated and stylish spaces. If you’re considering upgrading your master suite bathroom, here are some contemporary trends to inspire your renovation project:
1. Spa-like Atmosphere
Create a serene spa-like ambiance in your master suite bathroom by incorporating calming colors, natural materials, and minimalist design elements. Opt for a neutral color palette, such as soft whites and earthy tones, to evoke a sense of tranquility and relaxation. Integrate features like a rain shower, freestanding soaking tub, and heated floors to enhance the spa experience at home.
2. Smart Technology
Embrace the convenience of smart technology in your modern bathroom remodel by incorporating high-tech fixtures and features. Consider installing smart mirrors with integrated lighting and touchscreen controls, programmable shower systems with personalized settings, and voice-activated faucets for hands-free operation. Smart thermostats and lighting can also enhance energy efficiency and create a personalized ambiance in your master suite bathroom.
3. Freestanding Bathtubs
Freestanding bathtubs are a popular choice in modern bathroom designs, adding a touch of elegance and sophistication to the space. Opt for sleek and sculptural designs in materials like acrylic, stone, or copper to make a statement in your master suite bathroom. Position the bathtub near a window or under a skylight to create a focal point and amplify natural light in the room.
4. Statement Lighting
… READ MORE >>>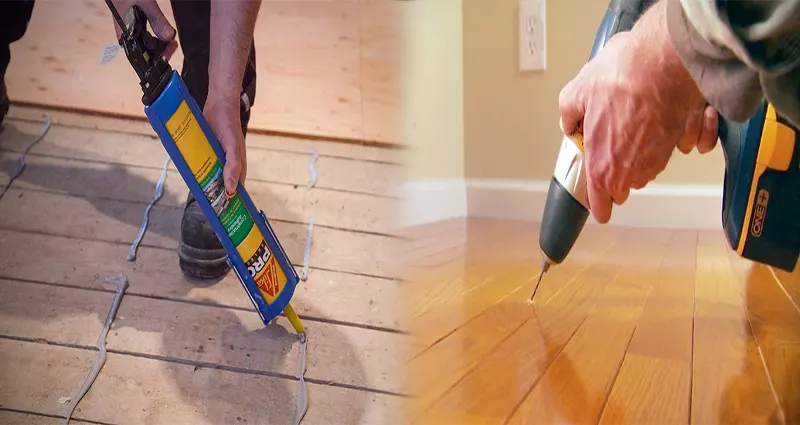
Common Causes of Squeaky Floors and Easy Fixes: A Comprehensive Guide
Squeaky floors can be a nuisance in any home, disrupting peace and quiet with every step. Fortunately, many of the common causes of squeaky floors have simple solutions that you can implement yourself. In this guide, we’ll explore the root causes of squeaky floors and provide easy fixes to help you silence those annoying creaks and groans.
1. Loose Floorboards
One of the most common causes of squeaky floors is loose floorboards. Over time, the flooring materials may shift or become detached from the subfloor, leading to squeaks and creaks when weight is applied.
Easy Fix:
- Identify the loose floorboards by walking over the affected area and locating the source of the squeaks.
- Secure the loose floorboards by adding screws or nails along the edges to reattach them to the subfloor.
2. Subfloor Issues
Subfloor problems, such as gaps or uneven surfaces, can also contribute to squeaky floors. When the subfloor is not properly supported or has gaps between the joists, it can lead to movement and noise when pressure is applied.
Easy Fix:
- Fill gaps in the subfloor with shims or construction adhesive to stabilize the flooring and reduce movement.
- Reinforce the subfloor by adding additional support beams or sistering joists to eliminate unevenness and prevent squeaks.
3. Moisture and Humidity
Excess moisture and humidity in the air can cause wood flooring to expand and contract, leading to squeaks and gaps between planks.
Easy Fix:
- Maintain consistent humidity levels in your home with a dehumidifier or humidifier, depending on
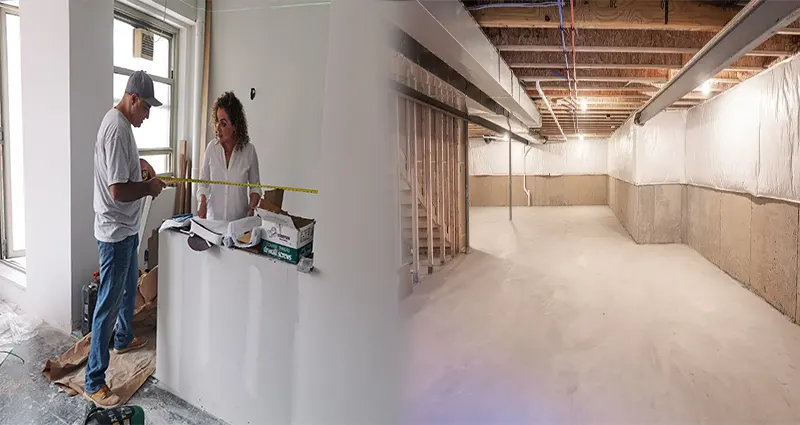
Hiring a Reliable Home Remodeling Contractor for Basement Renovations: Your Ultimate Guide
Are you considering transforming your basement into a functional and stylish living space? Whether you want to create a cozy family room, a home office, or a guest suite, hiring a reliable home remodeling contractor is crucial for ensuring your basement renovations are a success. Here’s your ultimate guide on how to find and hire the right contractor for your basement remodeling project.
Determine Your Needs and Budget
Before you start searching for a contractor, clarify your renovation goals, needs, and budget for the project. Understanding what you want to achieve with your basement renovation will help you communicate effectively with potential contractors and set realistic expectations.
Research and Shortlist Potential Contractors
Begin your search for a reliable home remodeling contractor by asking for recommendations from friends, family, or neighbors who have recently completed similar renovation projects. Additionally, utilize online resources such as review websites and social media platforms to compile a list of potential contractors in your area.
Check Credentials and Experience
When evaluating potential contractors, verify their credentials, licenses, insurance coverage, and experience in basement renovations. A reputable contractor should be able to provide references, portfolio examples, and proof of compliance with industry regulations.
Request Detailed Quotes
Reach out to shortlisted contractors and request detailed quotes for your basement renovation project. A comprehensive quote should outline the scope of work, materials, timeline, and costs involved. Beware of contractors who provide vague or incomplete estimates.
Discuss Communication and Timeline
Communication is key to the success of any remodeling project. … READ MORE >>>
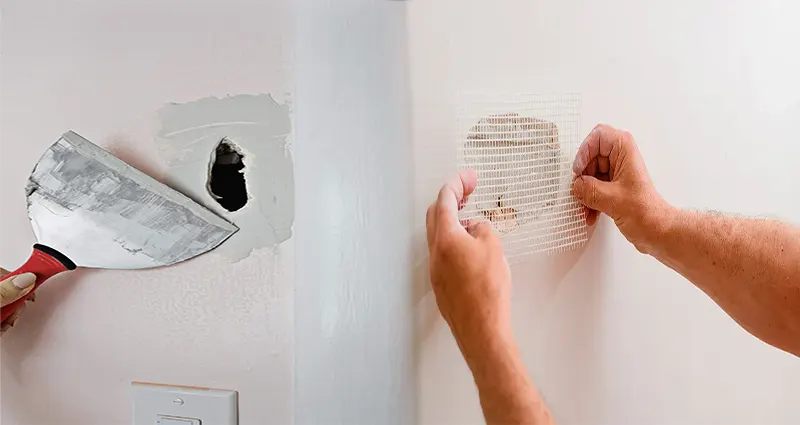
Patching a Small Hole in Drywall: A Step-By-Step Guide for DIY Enthusiasts
Are small holes in your drywall making your walls look less than perfect? Don’t worry, patching them up yourself is easier than you think! With just a few simple tools and materials, you can restore your walls to their former glory. Follow this step-by-step guide on how to patch a small hole in drywall yourself.
Materials You Will Need:
- Spackling compound
- Putty knife
- Sandpaper
- Paint (matching the color of your wall)
- Paintbrush or roller
Step 1: Prepare the Area
Start by cleaning the area around the hole to remove any dust or debris. This will ensure that the patch adheres properly to the drywall.
Step 2: Fill the Hole
Using a putty knife, apply spackling compound to the hole. Press the compound into the hole and smooth it out with the knife, ensuring that it is level with the surrounding wall.
Step 3: Let it Dry
Allow the spackling compound to dry completely. This usually takes about 24 hours, but follow the instructions on the product for the best results.
Step 4: Sand the Area
Once the compound is dry, use sandpaper to smooth out the patched area. Be gentle with the sanding to avoid damaging the surrounding wall.
Step 5: Paint the Patched Area
Finally, paint over the patched area with a paint color that matches your wall. Use a paintbrush or roller to seamlessly blend the patch with the rest of the wall.
Congratulations! You have successfully patched a small hole in your drywall all by yourself. Enjoy … READ MORE >>>
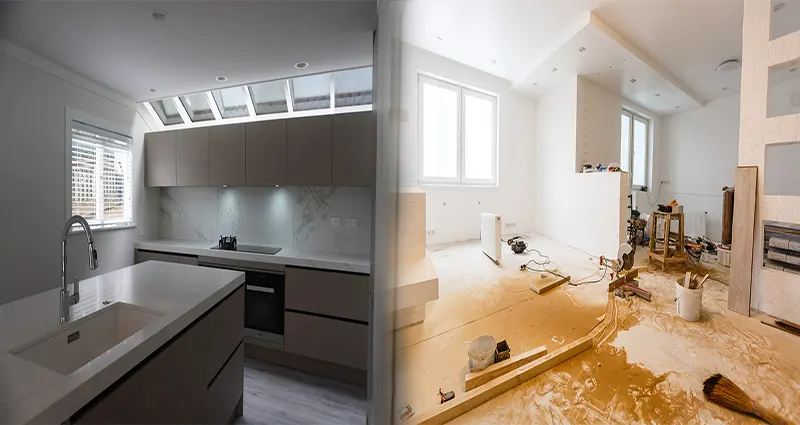
Benefits of a Whole Home Remodel for Increasing Property Value
Investing in a whole home remodel can yield numerous benefits for homeowners, one of the most significant being an increase in property value. Whether you are planning to sell your home in the near future or simply want to enhance your living space, a comprehensive renovation can have a positive impact on your home’s overall worth. In this article, we will explore the benefits of a whole home remodel for boosting property value.
1. Enhanced Curb Appeal
One of the first things that potential buyers notice about a home is its curb appeal. A whole home remodel can improve the exterior aesthetics of your property, making it more attractive and inviting. Upgrading features such as siding, windows, doors, landscaping, and the roof can significantly enhance the overall curb appeal of your home, which can lead to a higher resale value.
2. Modernized Interior Design
An outdated interior can be a major drawback when trying to sell a home. By undertaking a whole home remodel, you can modernize your living space and incorporate current design trends that appeal to buyers. Upgrading your kitchen, bathrooms, flooring, lighting, and fixtures can give your home a fresh and contemporary look, making it more appealing to potential buyers and increasing its value.
3. Increased Functionality and Livability
A whole home remodel allows you to reconfigure your living space to better suit your needs and lifestyle. By optimizing the layout of your home, adding additional rooms, or improving the flow of the space, you can enhance … READ MORE >>>